
Windows holds the topmost position when it comes to ranking the operating systems around the world. Its efficiency and accountability are unparalleled.
However, one cannot completely wean out the possibility of system or user-generated errors that might appear, such as Trustedinstaller.
Sometimes, you may discover that your Windows 10 PC is consuming a very high amount of power, your system is getting very slow, or the restart process of the PC is taking much longer. Well, Trustedinstaller may be the possible reason for this.
Many of you would like to know how Trustedinstaller.exe works. People have also been complaining about the high power consumption of Trustedinstaller.exe, which has reportedly slowed their system.
You may like to know the various ways to help you disable or remove Trustedinstaller from Windows.
This article will help you learn more about Trustedinstaller software and how to solve related issues.

How Does Trustedinstaller.exe Work?
Trustedinstaller.exe is a program belonging to the Windows Module Installer. It is also a major part of the Windows Resource Protection service and has been incorporated into all versions of Windows starting from Vista.
The main function of this program is to allow window updates to be installed, removed, or modified. It does the same function for other system components as well.
Trustedinstaller.exe is a trusted component of Windows, so you might not need to remove or alter it necessarily. You won’t even observe it, mostly.
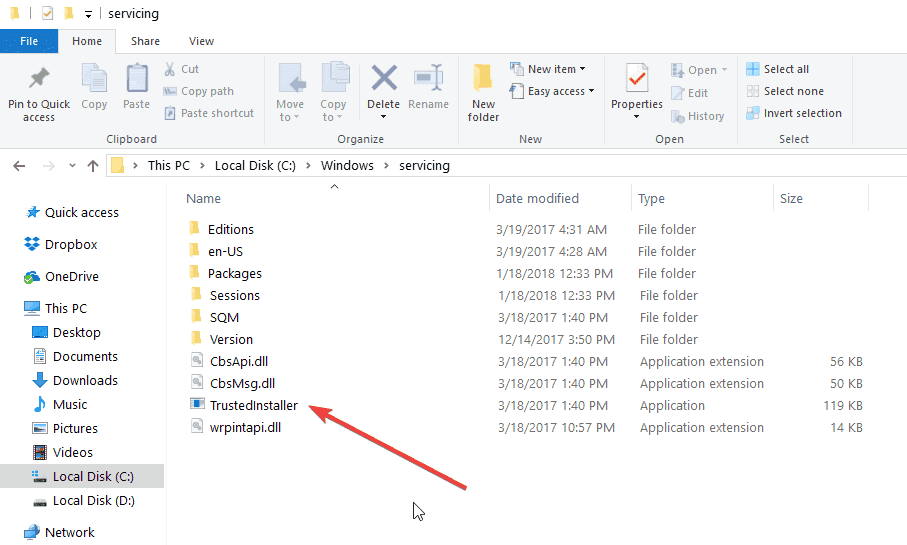
The size of this software is usually around 100-200 KB. Trustedinstaller.exe runs independently. It can be found by going to the C drive, then to the Windows folder, and then to the servicing folder.
This program’s functioning is controlled by the Local System Account. The normal setting of this software is set as per the manual instructions.
PS: Learn more about what COM surrogate is and Wondershare Helper Compact.
What is the Major Problem with Trustedinstaller.exe?
The major complaint of window users is that Trustedinstaller.exe consumes a high share of the power resources. This happens most of the time after a Windows update takes place and the system restarts. However, that’s how it is. It is normal. Just let the program do its work.
Many times, you will also discover that this software is corrupted. You may also see error messages popping up on your screen once you open any file related to Trustedinstaller.
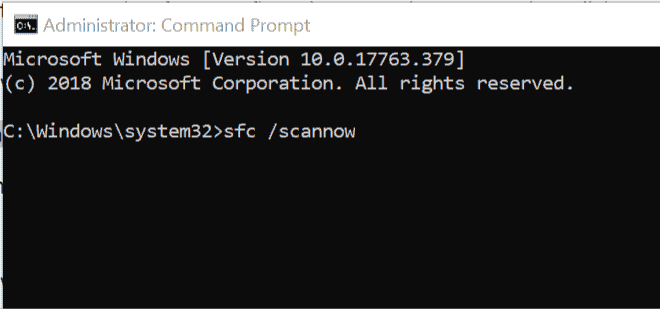
In that particular case, you can get help from the System File Checker. This will allow you to remove corrupted or deleted system files.
The problem gets worse when the Windows Resource Protection Service, which enables the System File Checker, starts malfunctioning.
In such a scenario, if you try running the sfc/scannow, you will see an error message which states that Windows Resource Protection has failed to enable the repair service.
The very next step you need to follow will be either repairing your Windows 7 or restarting Windows 10/8.
Besides, also find out what is Distnoted.
Is It Feasible to Disable Trustedinstaller.exe?
Undoubtedly, there are many ways that will help you disable or even remove Trustedinstaller. You can find such methods on a lot of websites.
However, you may not actually want to do that since the software is a protected system program. If you stop this program, then your Windows update system might crash, leading to the failure of the update installation.
By the way, if you wonder how to remove FileRepMalware with ease or how to deal with Intel Delayed Launcher Slowing the Bootup, click to read more.
Can Trustedinstaller Be a Virus?
No, Trustedinstaller is not a virus. The major problem with this software is high power consumption. If you are facing the same issue, then there can be a possibility that the software might have been corrupted or hijacked by any other malware similar in name.
How Can You Detect The Virus And Remove It?
A possible way to check your Trustedinstaller.exe with any malware is to inspect the CPU and its load. InSpectre can be one tool that you can use in performing a CPU performance check. Many other tools can be used to do this job.
If your Trustedinstaller’s power consumption is high almost all the time, then there are possible chances that your system might have been infected by a malware program.
A second method to detect malware that might have crept into your system is to check the location of your file. If the location of your Trustedinstaller.exe is not found to be at the right place, that is, the C drive, then it is malware.
The virus Trustedinstaller is very dangerous, and you may not be able to detect it because of the similarity in the names. This malware can access your microphone and camera hideously. If you fear that hackers might be misusing your webcam, then you can try this software for your webcam and privacy protection.
Using SFC Scan in Place of Trustedinstaller
If you are still confused and are not able to remove Trustedinstaller malware from your Windows, then we would advise you to start running a check on the System files. This will help you to be assured that your files are in the right order.
Let’s have a look at how to do it.
- Go to the search box and enter cmd. After that, right-click on the first option and choose Run as Administrator.
- In the same cmd window, type sfc/scannow. Let the process finish, and after that, just restart your system.
Taking these steps will also fix the corrupted files (if any) and Trustedinstaller. Everything will be back to normal after that.
If you know that Trustedinstaller is malware, you should remove it as soon as possible. To make this possible, you must check out this tool called Bitdefender, which removes malware.
By the way, let’s learn more about how to get administrator privileges on Windows 7.
How to Remove Trustedinstaller Protected Files?
Ever had a problem removing certain files from your computer system? Were you denied permission to access these files even when you were the administrator?
The answer to all these questions lies with Trustedinstaller.exe, the owner of all such files.
You get error messages or denied permission requests from this particular program. So, to remove these files, you first have to obtain ownership of them and then take full control of their rights and permissions.
Note: Do not use these steps to remove any basic Windows program like Internet Explorer or Windows Defender. You will only end up messing with the entire system. This tip is useful only for removing malicious files from your system.
This Method Will Help You Take Control of the Files You Wish to Remove.
1. To do this, the first step is to go to a particular folder and right-click on it. Choose ‘Properties,’ and it is from here that you can change the permissions.

2. Now, you need to click on the ‘Security‘ tab. Then, select the ‘Advanced‘ button on the lower left of the window panel.
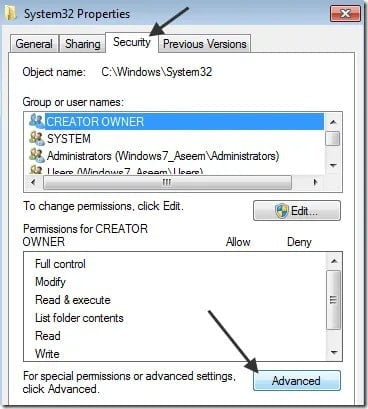
3. Then, click on ‘Owner,’ and you will notice that Trustedinstaller is the present owner.
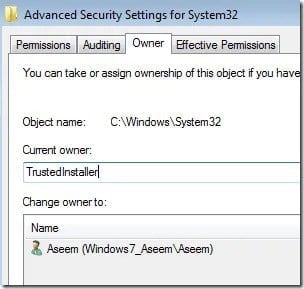
4. Go to the ‘Edit‘ option (it’s the same as the ‘Change‘ button in Windows 10). Here, you can choose the owner, which can either be the Administrator’s group or your account.
If the Administrator’s account is your own account, then you may just select the Administrators option.
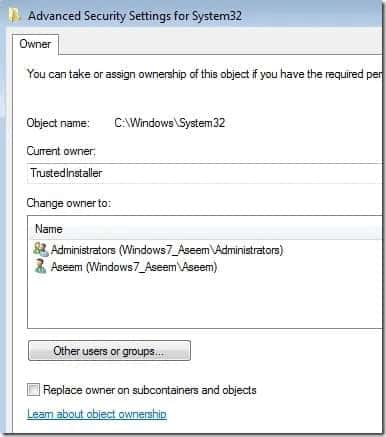
5. You may also tick off ‘Replace owner on subcontainers and objects‘ if you want more than one file to be deleted. Now, click ‘OK.’ The owner will now be the account that you selected.

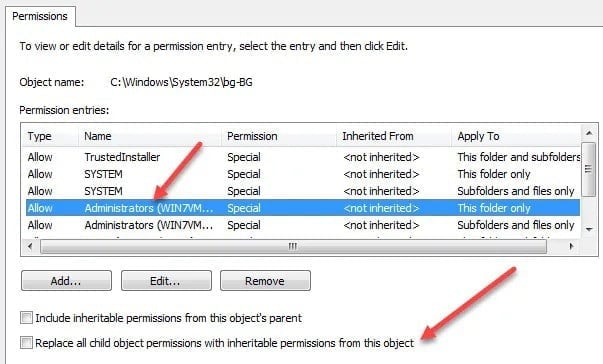
6. Be careful if you want to delete a folder that contains other sub-folders. In this case, you will click on the ‘Permissions‘ tab and select ‘Change Permissions.’ Then, you choose what Administrator account you wish to use.
After that, tick the ‘Replace all child object permissions with inheritable permissions from this object‘ box. Here is a point to remember.
The first step has to be changing the owner account of the files and folders. It is only after doing this that changing permissions would be possible.
7. Keep clicking ‘OK,’ and close all the properties windows. Once you are on the primary screen, right-click the file or folder again. Select the ‘Properties‘ option again.
8. Again, click on the ‘Security‘ tab and choose the ‘Edit‘ button.

9. Now, select the user name from the given list to whom you would like to give permission. Remember that this user name should be similar to the present owner’s name. If the list doesn’t have that user name, click on ‘Add‘ and enter the name. Click ‘OK.’

10. After this, you may check the box against the ‘Full Control‘ option. Doing this would automatically check all the boxes below that.
11. Click OK twice, and you are back to the Windows Explorer screen. The process is over, and now you have the permission to remove trustedinstaller protected files without any hassle—no more error messages to deal with. The process is surely a long one but workable.
FAQs
Q1: Can I safely remove TrustedInstaller.exe from my system?
A1: Removing TrustedInstaller.exe is not recommended for most users as it can lead to system instability and security vulnerabilities. It’s best to explore alternative solutions for managing Windows updates before considering its removal.
Q2: Does removing TrustedInstaller.exe improve system performance?
A2: TrustedInstaller.exe is not typically a resource-intensive process. Removing it is unlikely to have a significant impact on system performance unless there are specific issues related to it.
Q3: Can I reinstall TrustedInstaller.exe if I remove it?
A3: TrustedInstaller.exe is an integral part of the Windows operating system. It is not meant to be reinstalled separately. If you remove it, restoring it to its original state may require system restore or repair processes.
Q4: Are there any risks associated with removing TrustedInstaller.exe?
A4: Yes, removing TrustedInstaller.exe can result in system instability, security vulnerabilities, and the inability to install future Windows updates. It’s essential to weigh the risks and benefits before proceeding with its removal.
Q5: Can I disable TrustedInstaller.exe instead of removing it?
A5: While it’s possible to disable the TrustedInstaller service, it is not recommended for most users. Disabling it can have similar risks as removing it, and it may prevent the installation of important system updates.
Conclusion
We have seen all the issues related to Trustedinstaller and how it is an integral part of the Windows system. You must have now clearly understood that removing the program altogether is not a viable option.
However, you can deal with the Trustedinstaller-protected files and malware by following our methods. Keeping your system virus-free is very important for a safe browsing experience.
So, go ahead with these tricks to remove the Trustedinstaller and work efficiently!


